Setting up your file to publish your book.
Step 3 in the ‘How do I self publish a Children’s Book’ series.
(The words and opinions of this blog are that of the author and her experiences. This is not professional advice, and should not be used in lieu of that.)This is all about the technicalities of publishing/printing your own book and where I had the biggest lessons and shortfalls. I write this with the intent of having you jump ahead and not have to go through the learning curves I did, please let me know if it’s more confusing than helpful or if I’ve missed parts that you need to know.
Once you have your print house account, you need to find the file size, file requirements especially regarding bleeds, and source an ISBN.
An ISBN? What is that? Do I need one?
The International Standard Book Number (ISBN) is a numeric commercial book identifier that is intended to be unique. Publishers (remember that’s you now) purchase are receive ISBNs from an affiliate of the International ISBN Agency.
Every print variation of your book such as hardcover, soft cover, board book, ebook needs it’s own ISBN. An ISBN is assigned to each separate edition and variation (the one exception being a reprint) of a publication.
An ISBN is 13 numbers long and is absolutely essential to publishing your book. It’s a worldwide catalogue of all the books that exist, it allows bookshops, retailers, distributors, etc. to find and source your book. It also provides proof of ownership to you.
Where do I get an ISBN?
When you print through Amazon they offer you a free ISBN, this can only be used within Amazon for that book only. So if you print a paperback version of your book through an independent print house and want it as print on demand on Amazon (like I do), you would need two separate ISBNs or purchase an ISBN and provide it to Amazon.
I purchase my books through Thorpe Bowker which is an Australian website, I think it cost me a one off fee of $50 AUD to start my account on first purchase and a single ISBN costs $44 AUD, but if you have more books cooking away in your brain and/or you want to release your book in multiple formats, a 10 pack of ISBNs through them are $88. There’s no rush or expiry date on using them.
What is this ‘bleed’ I keep mentioning?
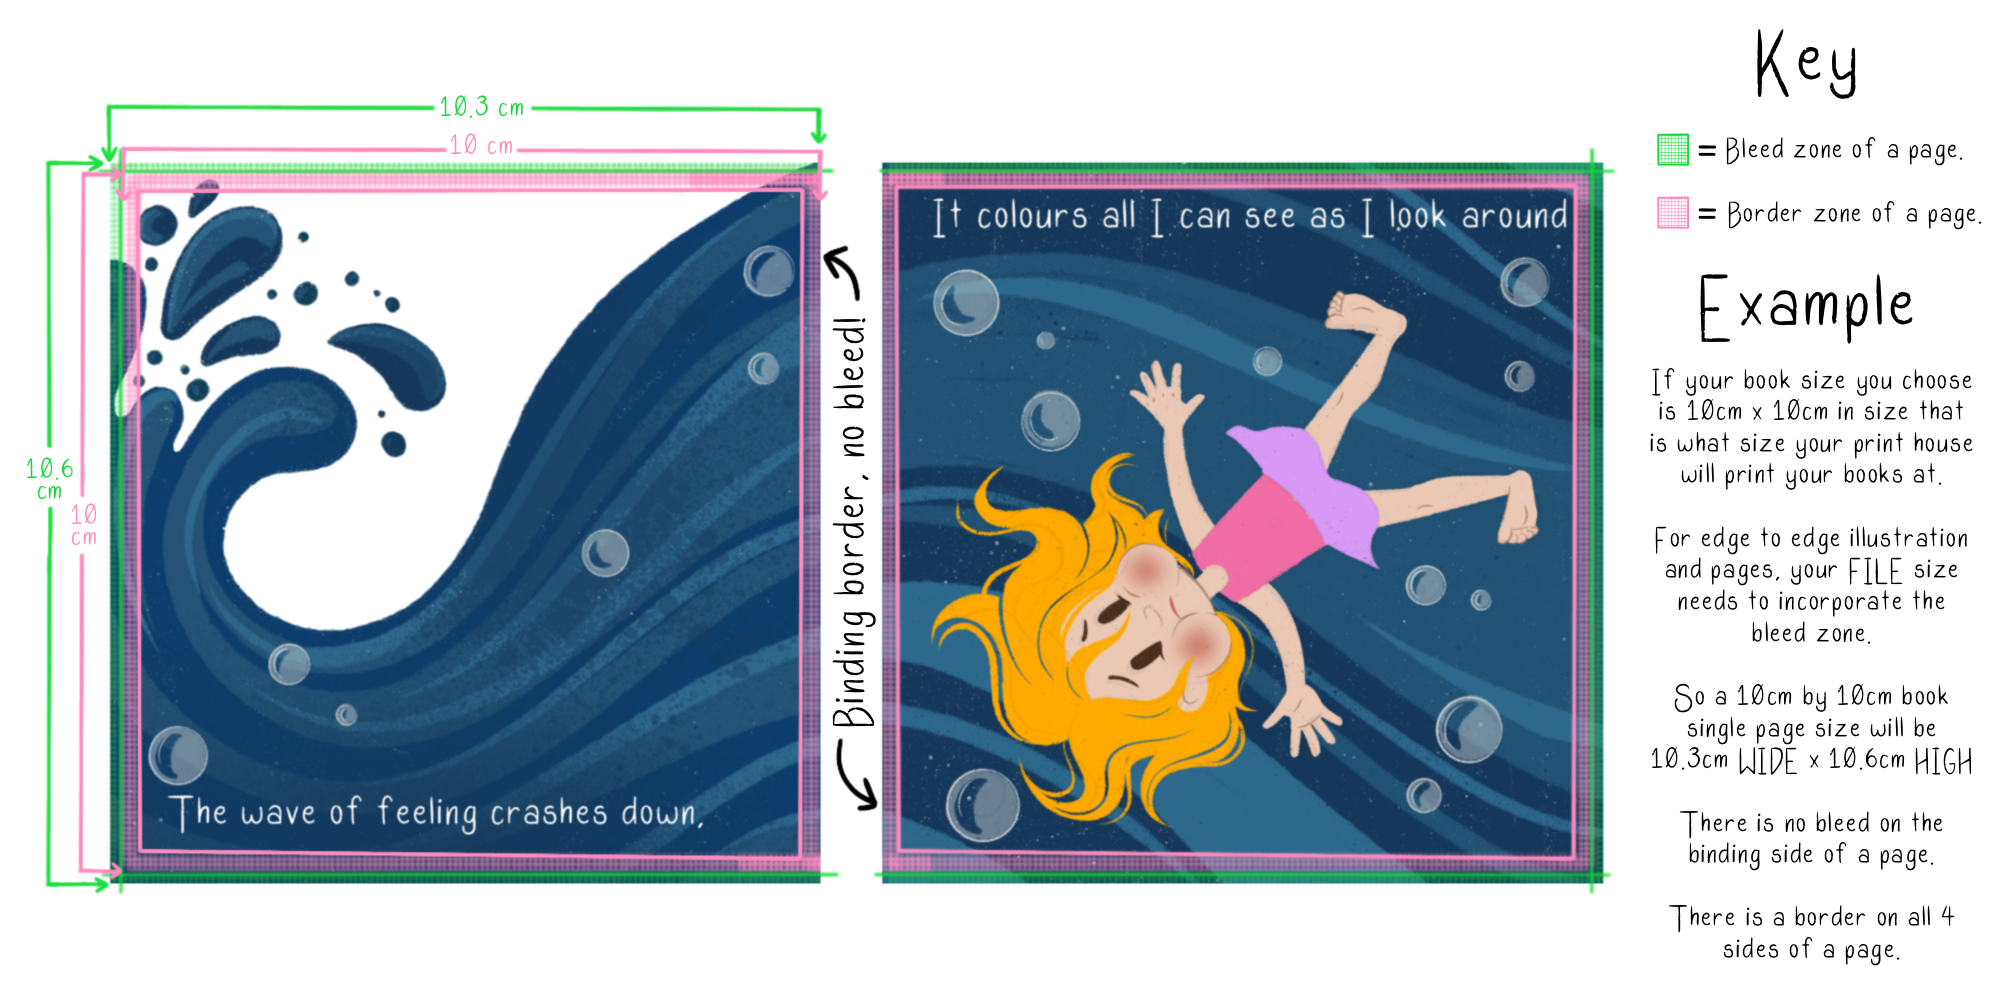
The bleed is a designated surplus to your file that allows for cutting and production error to keep your pages looking balanced and keep all elements where they need to be. This is a feature commonly used for picture books that have full page artwork or illustrations that touches (or goes very close to) the page edge. If you are fine / want a white border around the book then you can select no bleed.
Print bleed is only on 3 of the 4 sides of a page, the side that meets the spine of the book does not receive a bleed.
The bleed for both Ingram Spark and Amazon is 3.2mm (0.125” if you use imperial measuring). This bleed is added onto the 3 edges that does not touch the books spine. For example, if the book size you decided is 10cm x 10cm, then your page file size will be 10.64cm high x 10.32cm wide.
Lets have a look at the whole page layout:
A page is built into multiple sections or elements:
Page content zone - this part is the area within the pink border line. where all the body of the page needs to be. The page will not be will not be approved if any text exceeds the content zone. The illustrations will be up to you, if they exceed that zone you have a chance it will get cropped and missed on some prints. Nothing critical to the story leaves this area.
Border zone - No text is physically allowed to be outside this line, if it does (or in my experience even if its on the line), you will continually have your files rejected. Elements here will still most likely remain on the physical product.
Bleed area - this is the trim line, where the cuts happen. Occasionally file conversion or cutting of the pages will slightly offset. This is an insurance that the end product is not affected or aesthetically ruined.
I would love to know - have I made sense and cleared things up or made things muddier? If you feel comfortable letting me know in the comments below or send me an email / social DM. This part was so hard for me to understand from an inexperienced point of view and I really want to reduce this hurdle! Hindsight is so obvious, but it’s taken a lot of work and errors for me to understand.
What program do I build my files in?
You need to find out how your print house wants to receive your files and if they have any templates to download to help you correctly structure your files (especially the cover). Most (if not all) want the final file in high quality PDF.
Amazon takes your generic PDF export file, the kind of PDF you can export from Word, Canva, Procreate, Google Docs, etc. You can use all those programs but remember we need some custom dimensions, so from that list I personally use Procreate. If you’re not an artist or use Procreate, and not familiar with Adobe / keeping it cost effective then I would maybe use Canva? (I only don’t say this with certainty as I haven’t personally done this but I would be open to trialling it if I needed another way). You can customise exact file sizes with these programs.
Ingram Spark want a specific PDF 2001 file type. To get that you have to use (well, I use) Adobe InDesign to create, which has a monthly subscription fee, it’s a bit of a bummer to pay for a program that I literally import my pages into, then export immediately file. Recently though, I learned that when it comes to designing the cover, you can import Ingram’s custom template and all your elements to build it within InDesign and that is truly helpful.
Another feature that I have learned to love about InDesign is that I can illustrate a page on a double spread (which is what I like to do to keep layout and pattern and colour consistency) rather than illustrate each page individually.
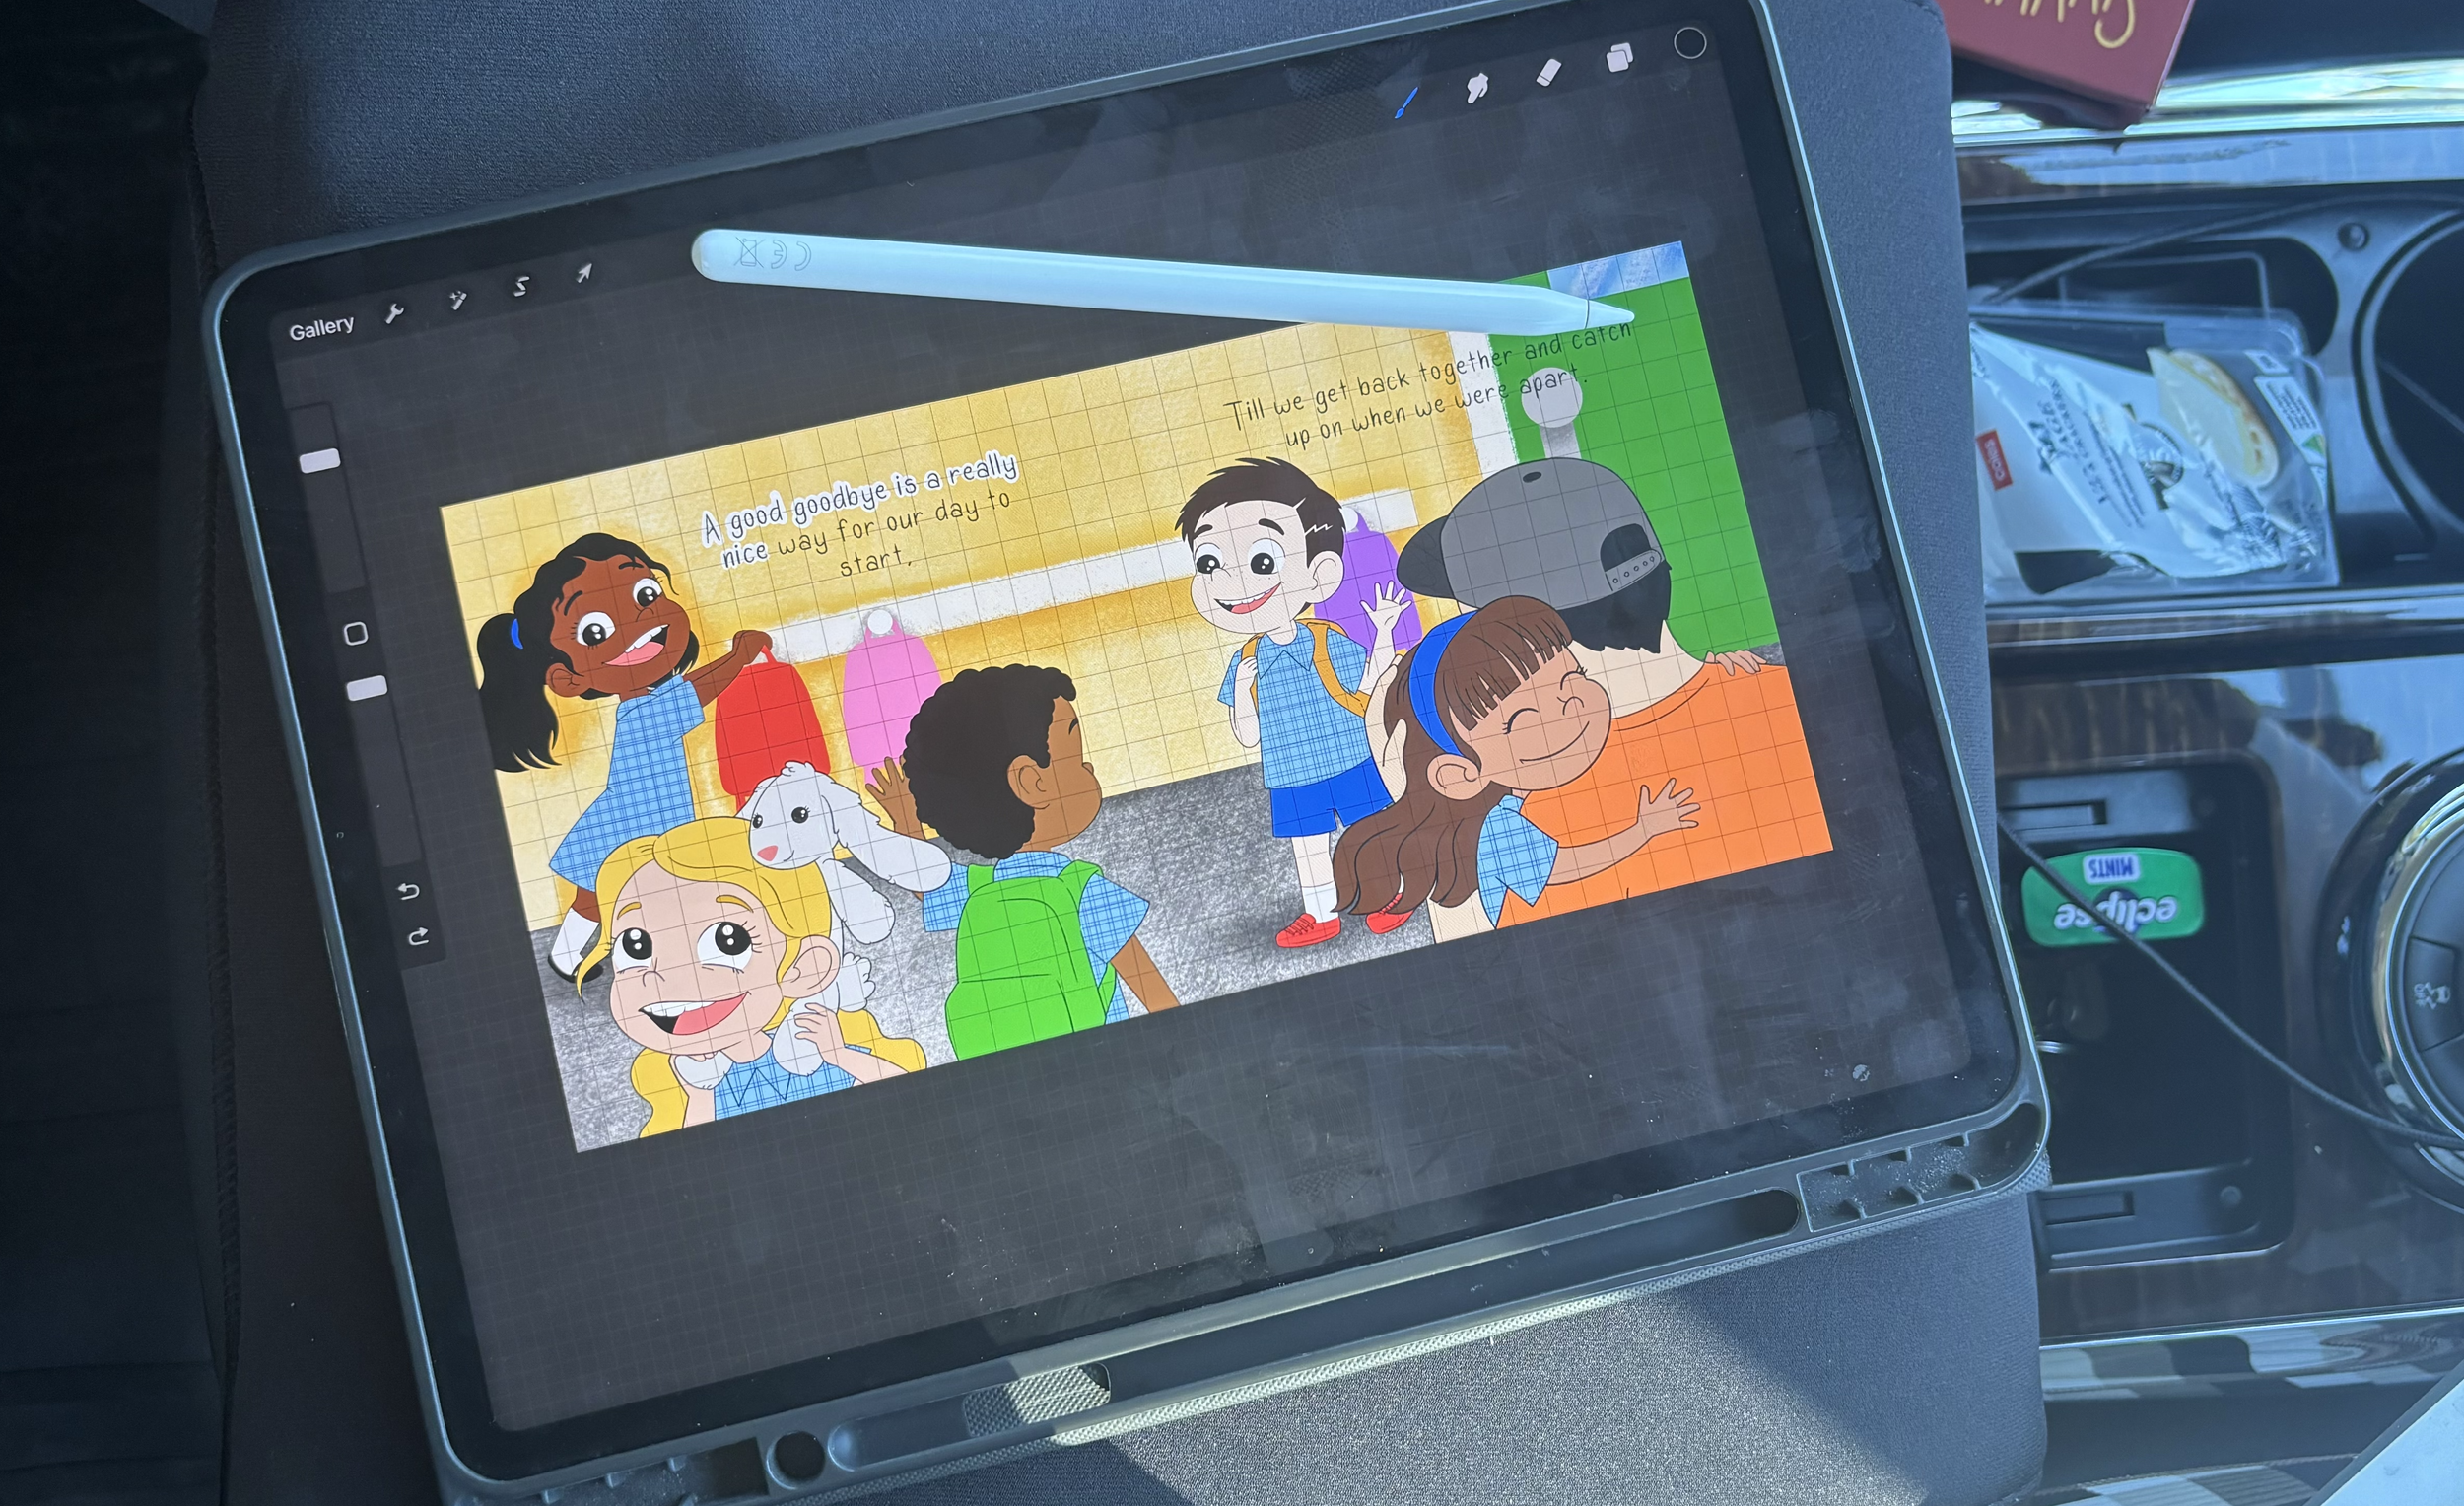
I illustrate in a double page format / style.
This is a sneak peek of a new book coming soon in Procreate on my iPad. You can see the page shape is an extended rectangle and is actually two pages that will be facing each other.
This lets the pages have full harmony in my design layout - I remain mindful of where the middle line and where the pages will be bound in the middle on the fact that there is a bit of visibility loss towards that zone.
When I submit this as a double page, InDesign separates them as single pages in my end file. Hugely appreciated and a big win for me.


